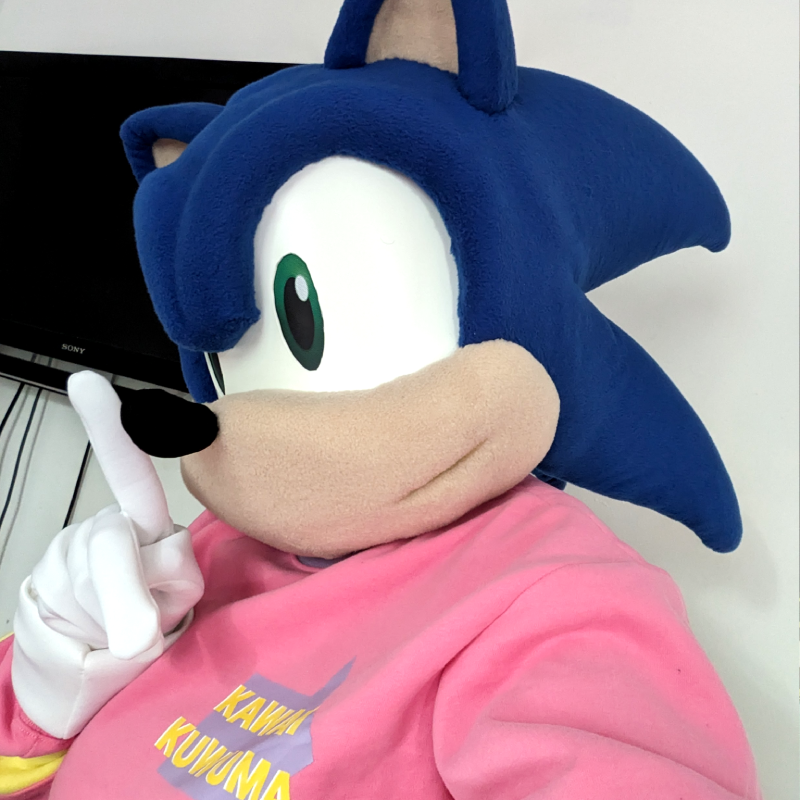
Sonic Mascot Suit Build Log
The Sonic the Hedgehog Fursuit/Mascot costume was quite the project! I wanted to fulfill my childhood dream of being a Sonic character, but THE WHOLEASS WAY. I hesitated between Shadow or Sonic, but I ended up going for Sonic so I could get silly with it. (Most of the fun of performing as a mascot is being silly, after all.) I learned lots of fun things during this build, so let’s buckle up and get through it!

Part 1: The Head Base
First things first, I grabbed some reference photos online of the model I wanted to replicate (Modern Sonic, mid 2000s) and scaled them up to print so I could have an idea of how big I’d have to make the head for it to stay in proportion with my body. My goal was to stay generally mobile in this costume and only need help from a handler in big crowds, so I didn’t want to build the body up like the current official Sonic Mascots do. Therefore, scaling was a little more done on vibes than accurate measurements.

Once I got the head scaling down, I started on the head base. Sonic characters have orbular heads, so I used Danny McFly’s Foam Sphere Calculator to help make a sphere pattern to the size I needed and got to work assembling it. I splurged and tried Spray Adhesive for the first time to cut down on hot glue drying times and it was a GAME CHANGER. Bonded foam within a minute, it stayed strong from edge to edge, and it didn’t get in the way of carving foam like hot glue typically does. I personally used 3M’s Super 77 Spray Adhesive as it’s locally available for cheap. Outside of a few cases, this is the adhesive I used throughout the entire build.
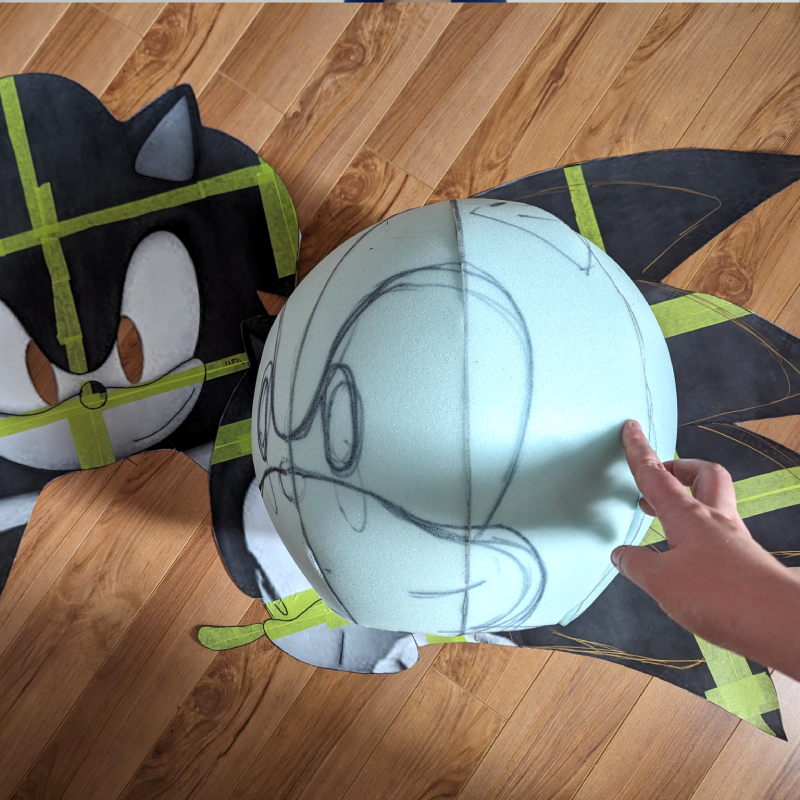
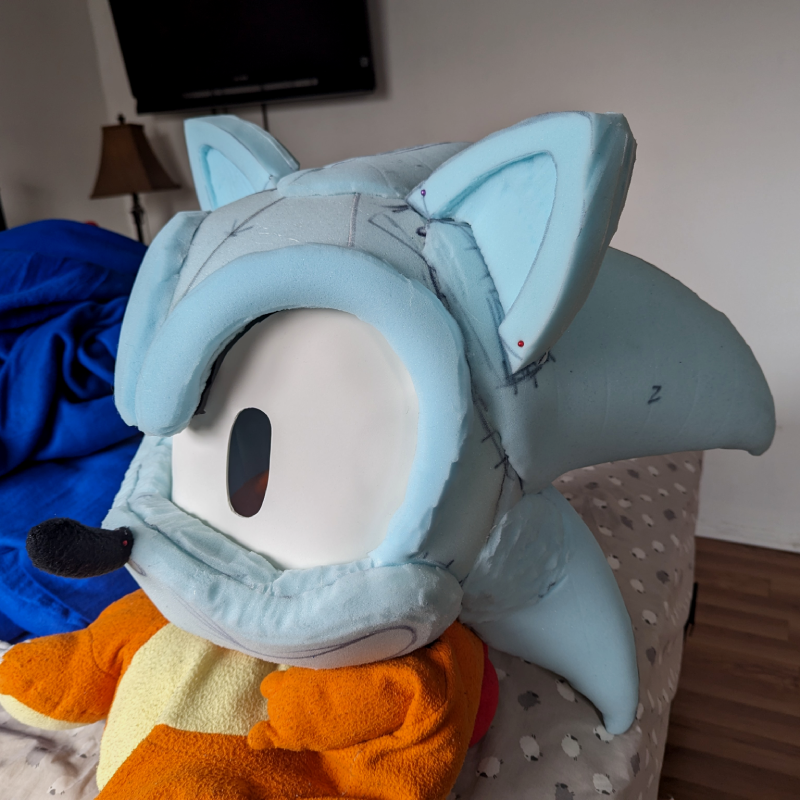
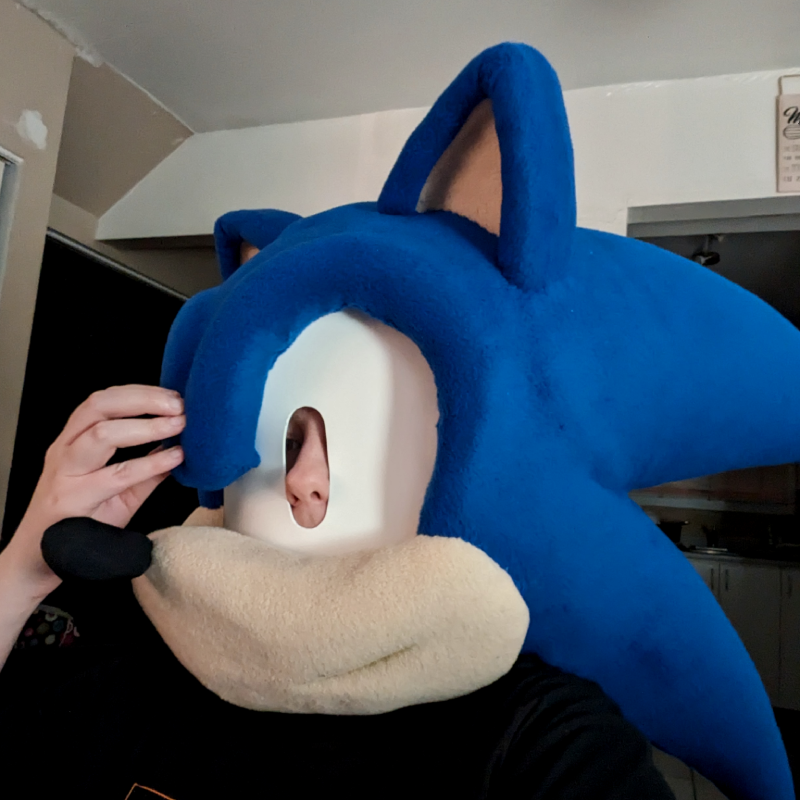
With the sphere base assembled, I began building up the muzzle and carving out the eyehole. I built a test eye… eyes?… I built a test eyeplate out of 3mm thick Sintra (a brand of solid foam PVC board) that I shaped using a heat gun. (Wear a respirator folks! Heated PVC fumes are NASTY. Protective gear is COOL) It wouldn’t be the final eyeplate, but having it around was indispensable as the plate itself shifted the foam around quite a bit when in position; it would have probably gotten deformed without the plastic visor to test with. the eyeplate was trimmed over time throughout the build and became the pattern for the final version of it. I also added some aluminum wire to the inside of the “eyebrows” to help keep their shape close to the eyes and prevent them from flipping up during the crafting process.
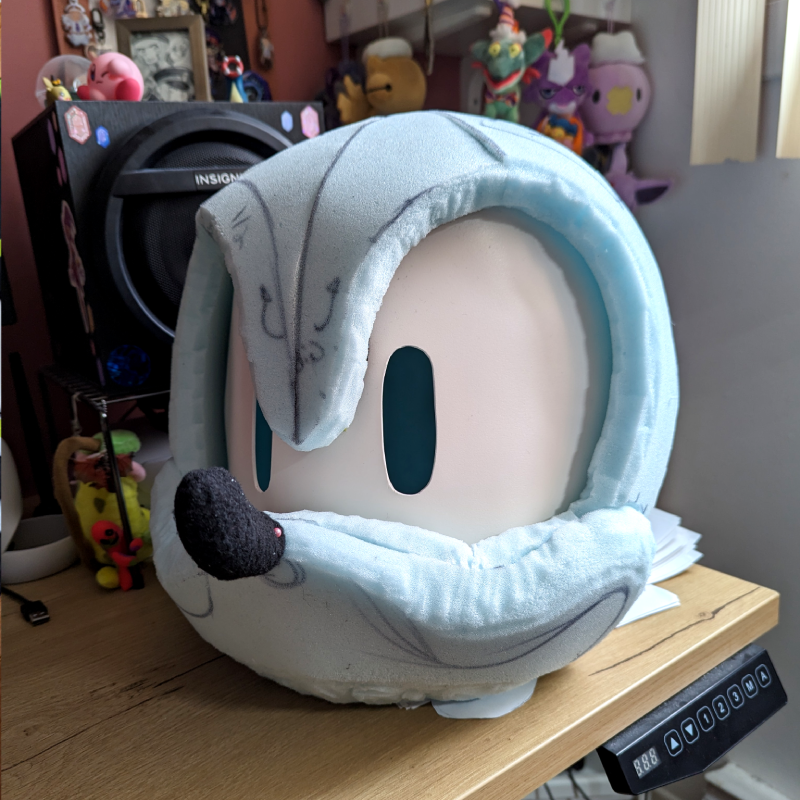
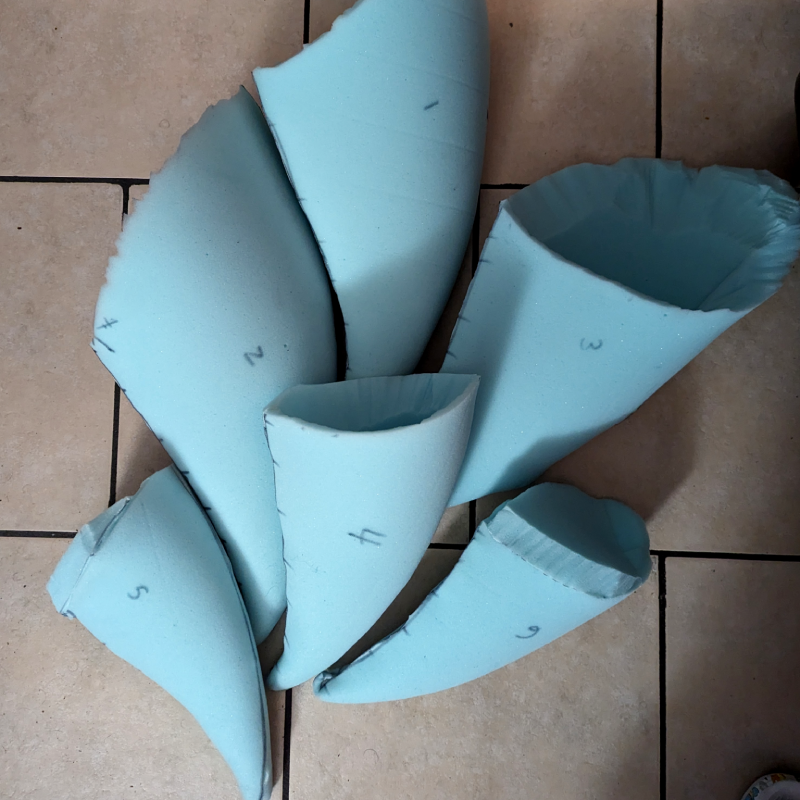
After getting the facial features blocked out, I moved on to the quills! Modern Sonic’s head has six quills of various sizes. I started by building out the top quill first, as it was the easiest starting point using the side profile as it was the least distorted one from the perspective. With that first spike glued together and pinned to the head, I made the two other “top row” quills using the same pattern I drew up for the middle top quill, leaving some extra material where they connect to the head so I could trim them down before pinning them down as well.

With the top quills done, I shortened the pattern significantly and used that to make the bottom quills, which were also trimmed to fit. I added a bit of foam to cap the holes closed and help them rest of my shoulders more comfortably.
Once Sonic’s Sick Haircut was properly glued to the head, I finished carving his facial features by adding some much needed eyebrows. I also carved some ears, though they weren’t attached as they would be covered in fabric separately before being added to the head. With everything in place, I finished sculpting the head, shaving down some of the rough patches where the quills connected to the head and building up some zones with extra foam.
I used some leftover lycra from a previous project and made a lining for the entire inside of the head. As the inside is still just a sphere, I simply reused the sphere pattern from the foam base and added some seam allowance to it. With the base done, I moved on to furring… er, fleecing the head.
Part 1.5: Skinning the Head
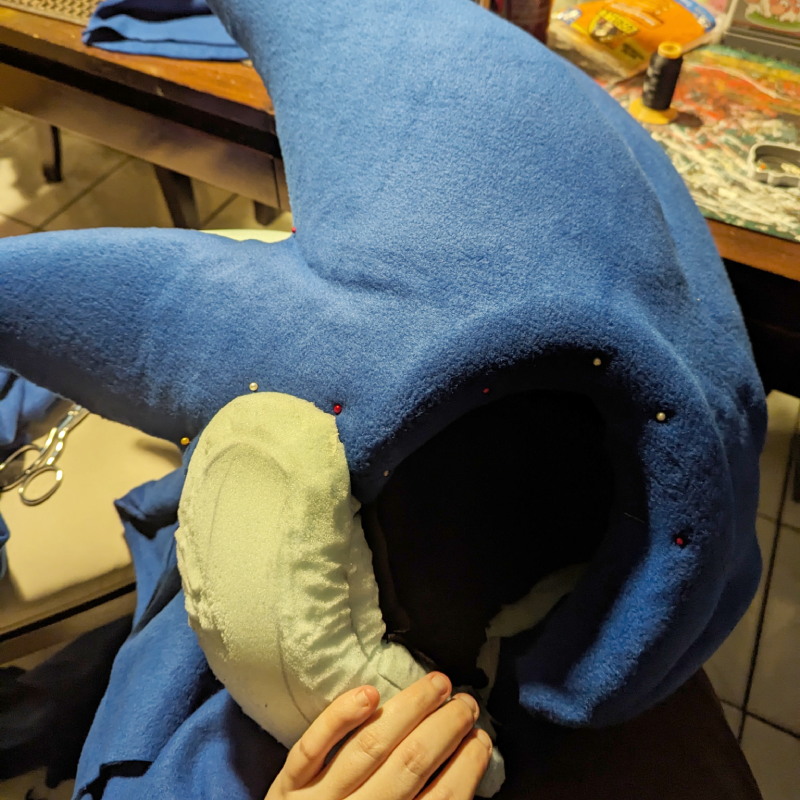
In order to get that Smooth Hedgehog Look, I decided to use fleece for this suit. I had been properly prepared for it to be kind of a mess (Fleece does NOT forgive), but it went pretty smoothly all things considered. For the most part, the head was mostly hand-sewn using a mix of ladder stitches and blanket stitches, with upholstery thread to make sure it’d be as solid as possible. Every piece was done by draping the fabric over the head, pulling it taut and pinning it down, then cutting loosely where I could hide seams (usually under each quill). I spent a sizeable amount of time watching GOMAJEOSSI’s videos for inspiration on how to go about it; they had invaluable advice for some parts of the build, particularly for the muzzle and ears.
I started by putting spray adhesive on the forehead to secure the main piece that would wrap around the sides, then pulled and pinned, cutting and sewing whenever I reached the back of a quill and stitching them closed with a ladder stitch. Earlier while making the base, I left a 2cm edge on each side of the muzzle unglued; that way, I could slide the fabric of the head under the muzzle for a seamless look. (Thanks, GOMAJEOSSI!)
I then draped the tan fleece over the muzzle and repeated the process, making sure to have plenty of extra fabric to tuck inside the head past the edge of the eyeplates. With the adhesive, I also made sure to really push the fabric into the space I carved for Sonic’s side-smile.
To finish things off, I switched to hot glue for more precision and tucked the muzzle fabric into the open space on either side. This gave the muzzle a very nice, defined shape, which stayed just as clean after a ladder stitch between the muzzle and head fabric.
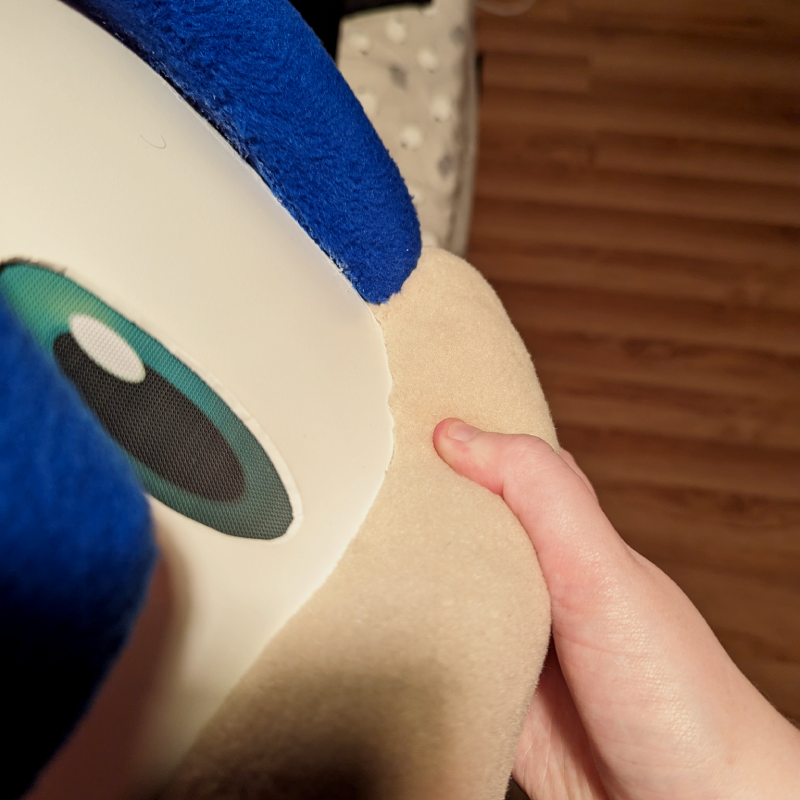
With only the details left, I used the same “unglued edge” technique for the ears, where the "edge" is the inner connection between the tan and blue piece, and gathering all the loose edges at the bottom. Once everything was bonded securely, I glued them to the head using Contact Cement for a super-strong bond (RESPIRATOR FOLKS), let it cure for a few hours, then ladder-stitched the ears to the head for a seamless look. Lastly, I carved another nose, covered it in black lycra, then glued and attached it to the muzzle using the same technique as the ears. With everything assembled, I mixed up some fabric paint into a nice dark shade and painted it into the mouth to really help define it.
SONIC GOT THROUGH ACT 1 (phew!). We'll cover the eyes later, since I was waiting for the eyemesh to come it at that point. Instead, I moved on to...
Part 2: The Shoes
Sonic’s shoes were the scariest part of the costume going in, but honestly they turned out to be a lot easier than I expected. I built them over a pair of shoes for a couple reasons, the most important one being, y'know, walking an entire day with no foot support on convention center cement flooring is BAD. Time to sacrifice an old pair of shoes for the shoe-ception build.
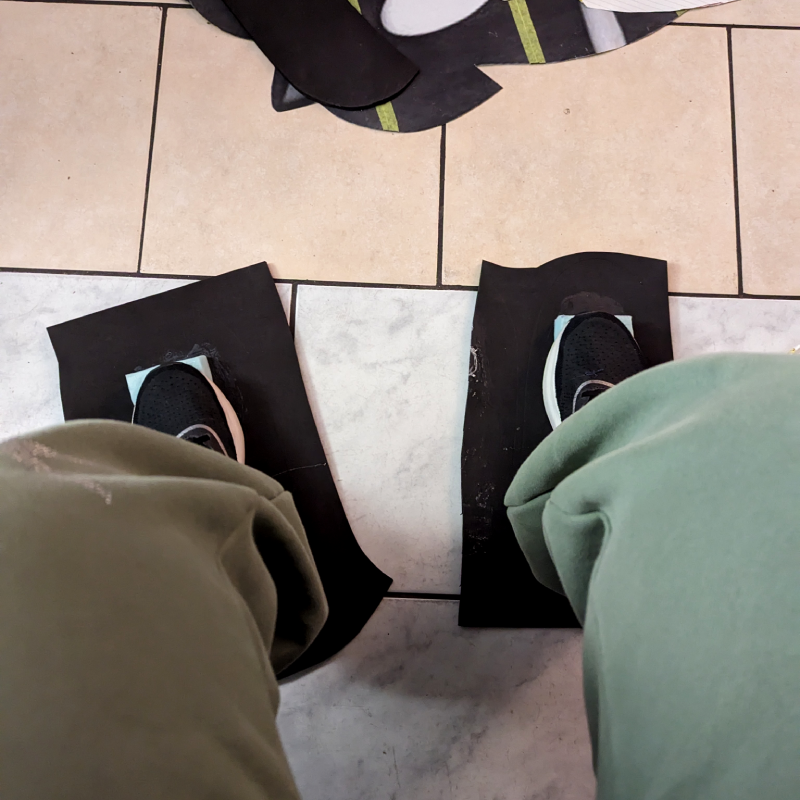
I needed a strong flexible base, so I took a sheet of High Density EVA Foam (Lumin’s Workshop Hard-lite), covered the bottom of the shoes and the foam in contact cement, then stood on my foam slabs for half an hour.
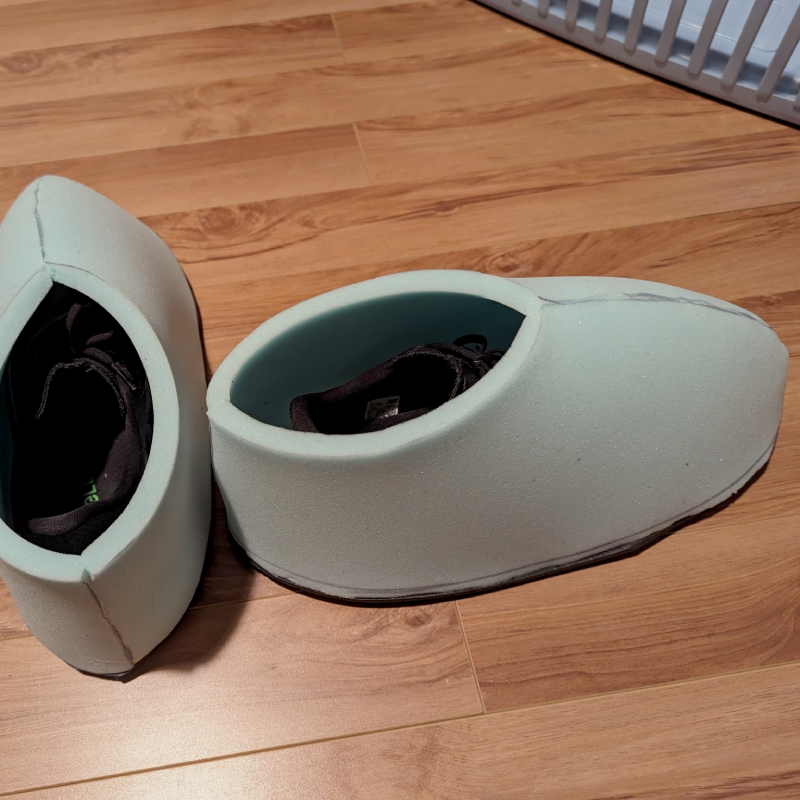
Once the bond between the shoes and foam was solid, I took them off and built the “body” of each mascot shoe (The upper) out of upholstery foam, just like I did with the head. I traced the shape of the soles on the EVA foam as a guide and then glued the uppers to the EVA Foam base using the sole line as a guide. Once that was done, I trimmed the excess EVA foam down.
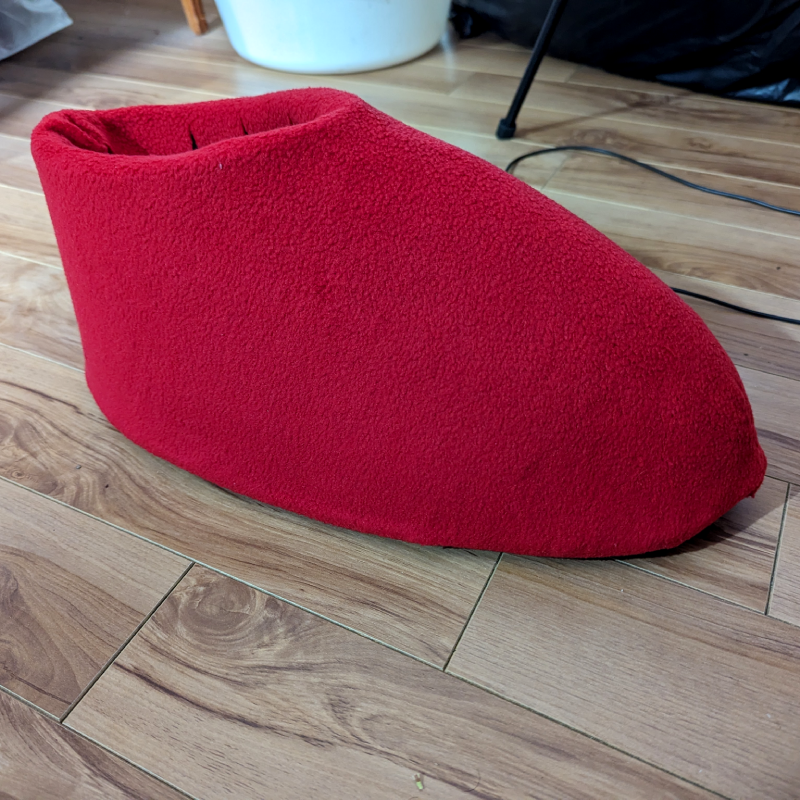
With the base of the shoes done, I got to work covering them in red fleece the same way I did the head, with the seam located on the back of the heels. I cut the excess off and glued them on the inside and bottom of the shoes.
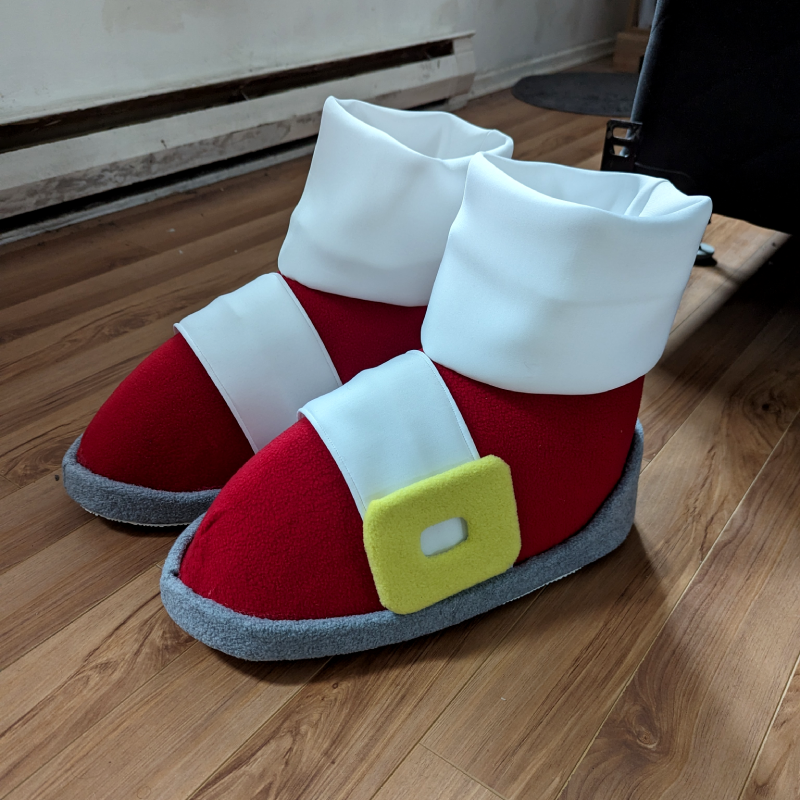
Once the shoes were covered in fabric, I tackled the details. The white bands were made out of white tech neoprene; it’s a stretch fabric with a soft 2mm foam core, which gives it a look that was perfect for the gloves; using it for the shoes to match all white fabrics together was a no-brainer. I cut some buckles out of the EVA Foam leftovers and covered them in yellow fleece, and did the same with the rim using grey fleece. I cut out the little divot on the back of the heels before applying the fleece. In both cases, I left the backside of the EVA Foam exposed to make it take adhesive better.
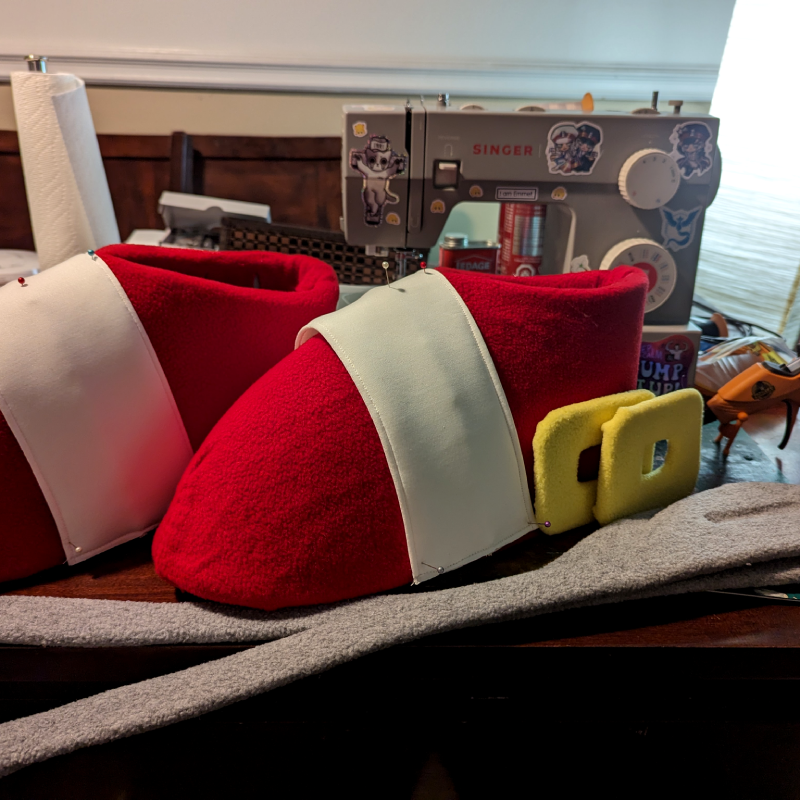
Just like with the soles, I glued all details on with contact cement. Shoes tend to take an absolute beating at cons, and the long cure time is a perfectly acceptable trade-off to make them as indestructible as possible. I let them cure overnight outside in the backyard to avoid being haunted by The Smell once I was done.
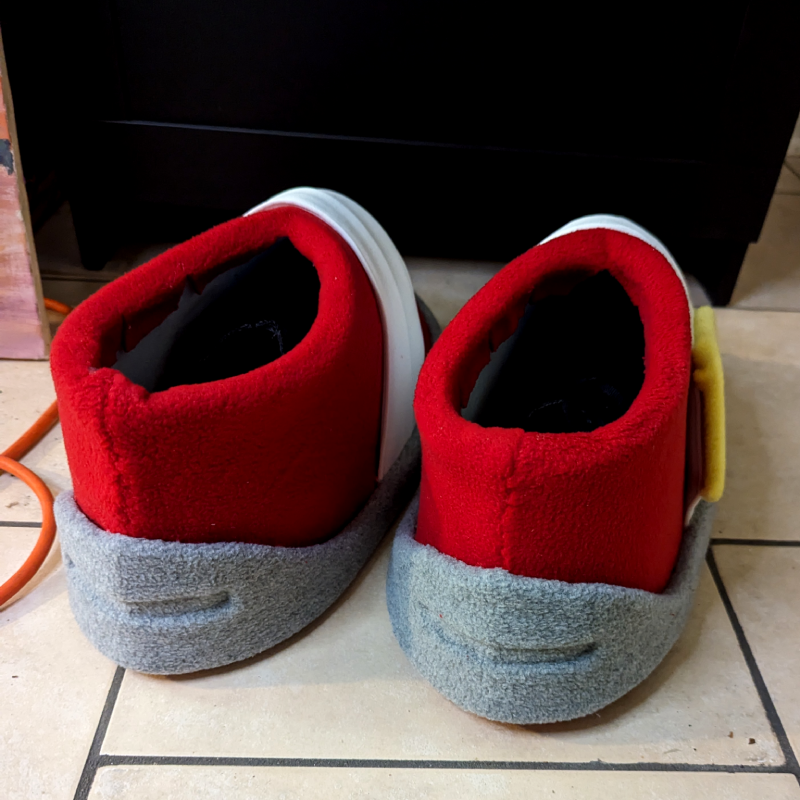
Once everything stopped smelling like toxic garbage, I sewed up some tubes of white neoprene on the sewing machine and then stitched them by hand to the shoes to create the socks. Lastly, I bought a slab of white shoe sole material, traced the bottom of each shoe, cut it to size and cemented them on the underside to make the shoes outdoors-ready and, hopefully, truly indestructible. And with that, the shoes were completed!
SONIC GOT THROUGH ACT 2! The most time-consuming parts of the build are now behind us. Things are picking up as we move on to the bodysuit.
Part 3: The Body
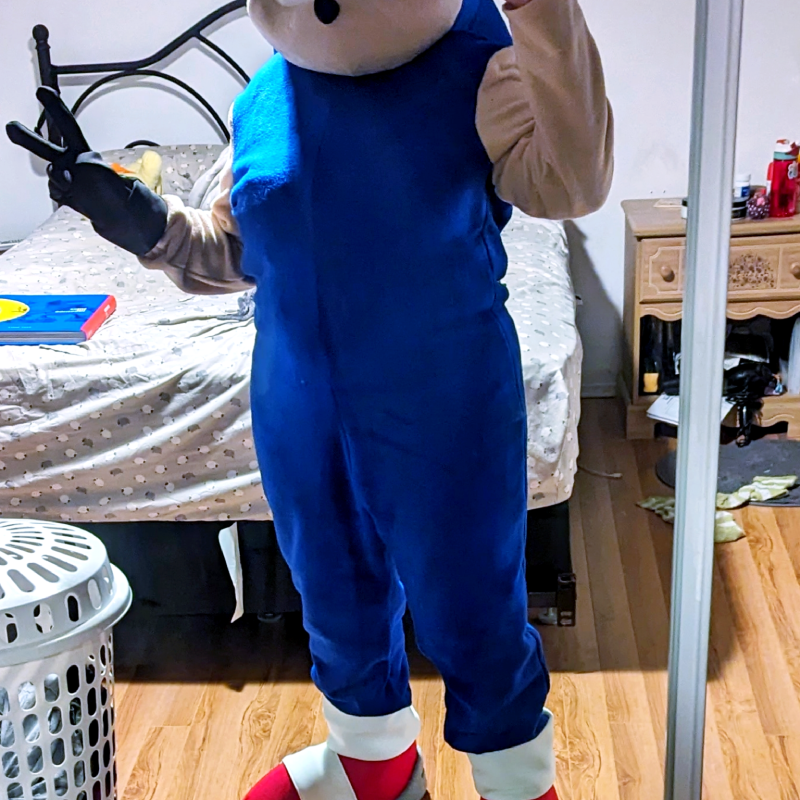
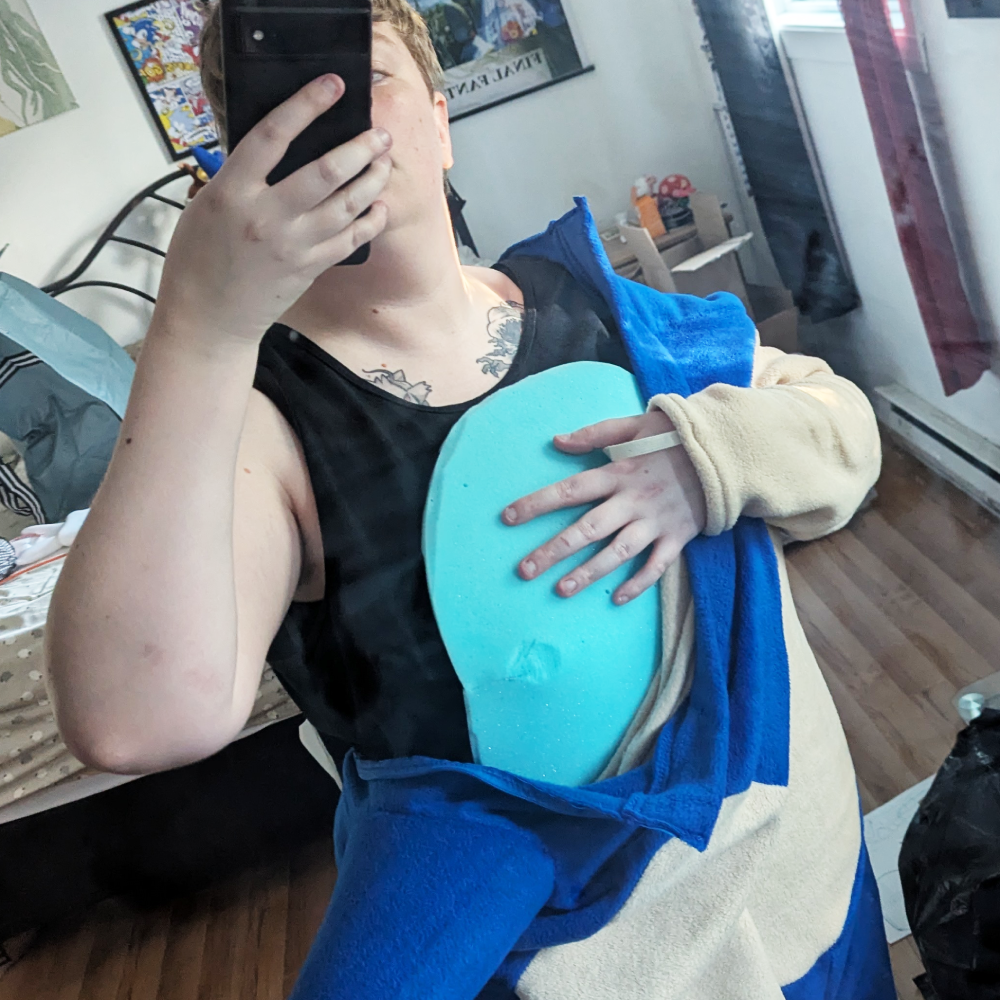
So Sonic’s body is pretty simple, as far as fursuits goes. In my case, I skipped body padding for comfort, so I felt making a duct tape dummy would be overkill. Fleece isn’t forgiving on complex shapes like a fursuit head, but it’s pretty stretchy, which makes it more forgiving on straight lines like, say, arms and legs. I used NDLWrkshop’s Jumper Pattern, printed and cut it matching my selected size, and got to work assembling the base following the instructions. I cut the front and back pieces out of blue fleece and the sleeves out of tan fleece. The only major change I made to the pattern was installing the zipper on the back of the suit instead of the front.
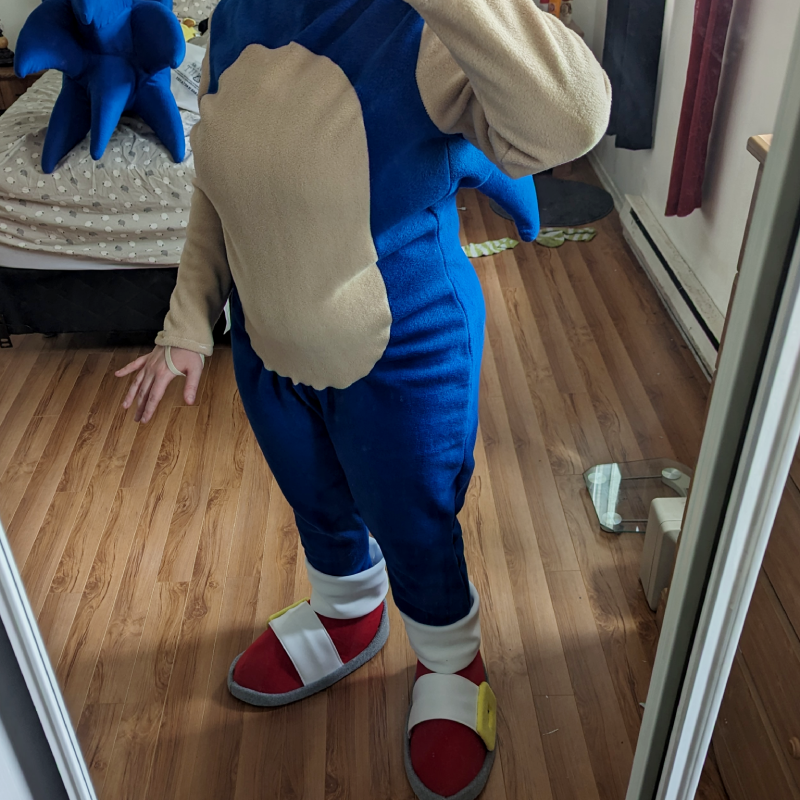
With the base done, I went ahead and made two back spikes using the bottom head quill pattern. I also carved a tail out of foam, and covered everything in fabric using the same drape and hand-stitch method as before. I then ladder stitched the back quills to the bodysuit’s back, double-sewing it for good measure since I predicted I’d probably smush them pretty often whenever I try sitting down.
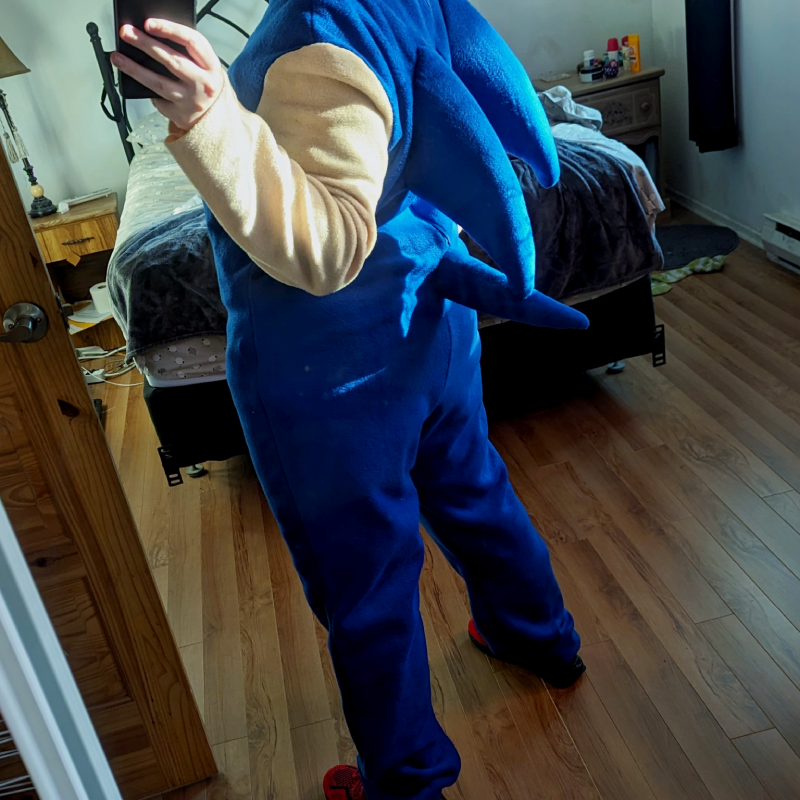
As you might have noticed, I also took a moment to tailor the arms and legs to fit closer to my body. It’s not a completely tight fit, but there’s only so far you can go for a fleece bodysuit without padding; if fleece picks up the details of a fursuit head base when it’s not completely smooth… I didn’t really want Sonic to accidentally end up with big naturals, so the slightly baggy “mascot” look was acceptable to me. After attaching the spikes, I hemmed the arms and legs and added two straps on the arms, one for each side. Their function is to keep the sleeves down into the gloves later while moving around, and it makes them much easier to put on. I then cut the stomach out of tan fleece, pinned it on the bodysuit, then slowly cut a hole in the bodysuit matching the stomach piece, carefully re-pinning the right sides of the suit and stomach together so I could machine sew them together for MAXMUM STRENGTH. I still ended up giving Sonic boobies by accident despite my best efforts but it’s nothing a good compression top can’t fix… Mostly.
SONIC GOT THROUGH ACT 3! Did somebody mention gloves?
Part 4: The Gloves
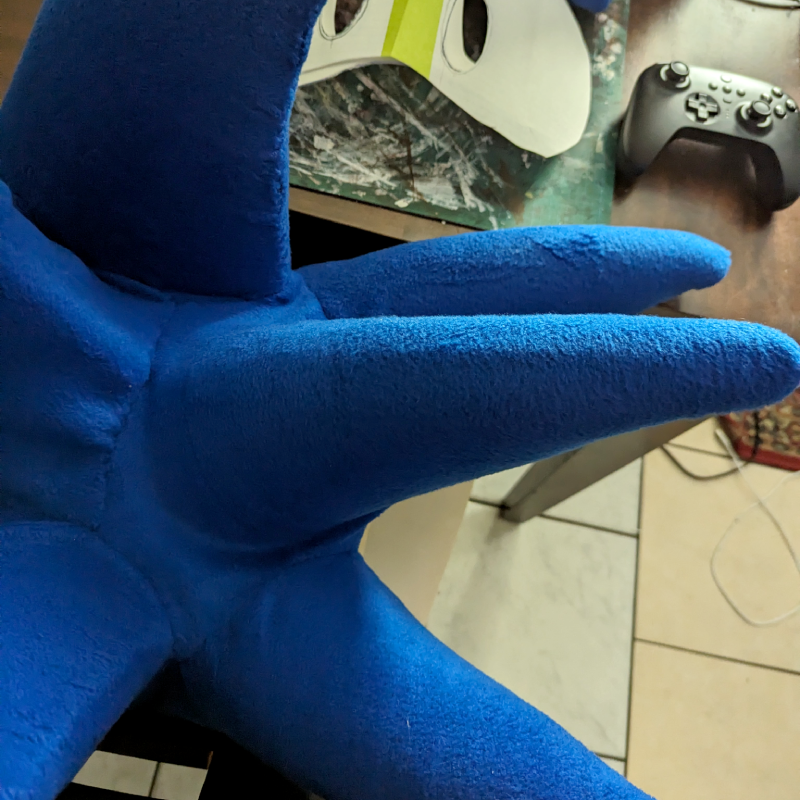
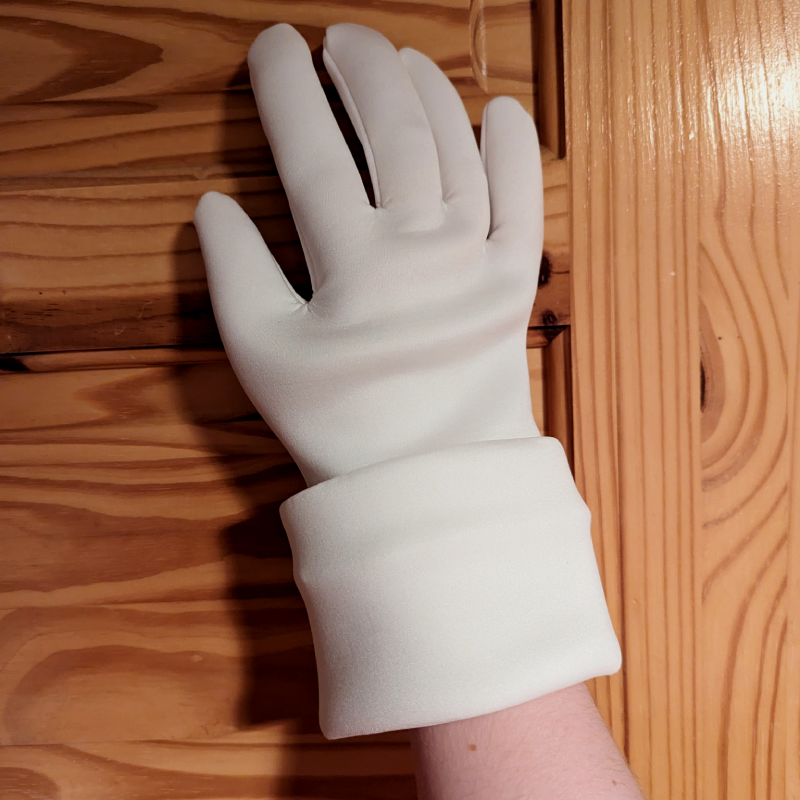
Sonic’s gloves aren’t super complicated compared to the rest of the build. They’re the reason I picked Tech Neoprene for the white fabric. That way, I could make them slightly oversized and have them keep their shape without having to add stuffing and lining to them and make them look… Mickey-ish. Mickey hands make you need a handler and if I’m at a con I’m going to be grabbing my phone every 5 minutes.
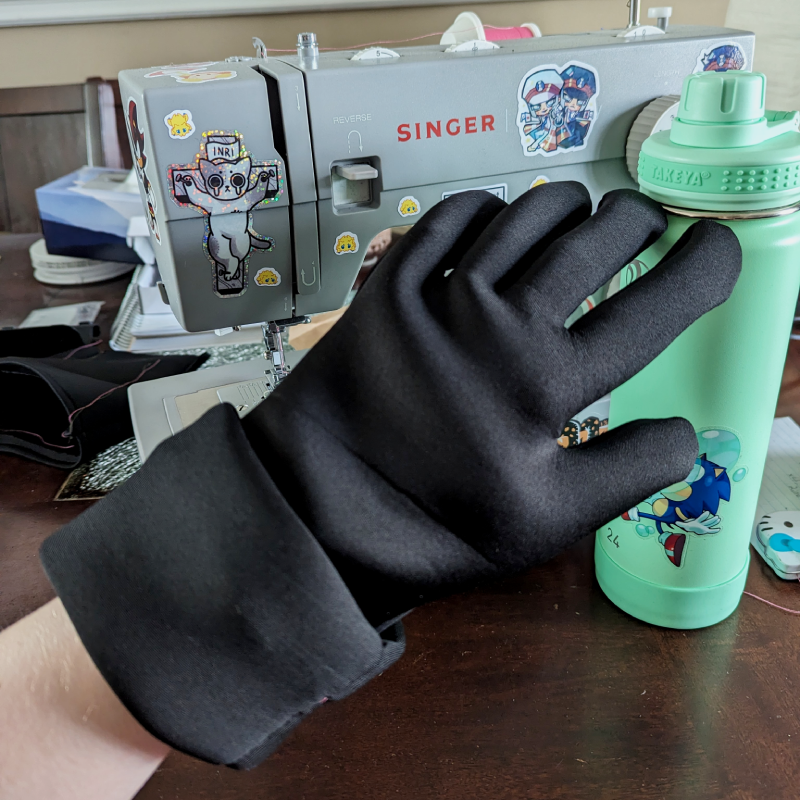
You might have noticed a fucked up black glove in previous photos. The truth is, the very first thing I actually did for Sonic was make a mock-up of the gloves using some leftover black tech neoprene I had lying around, so I could immediately buy the white one alongside all the fleece if my plan worked out. I drafted up a couple patterns tracing my hand on paper and adjusting finger width. I ended up making three gloves before I got a good mock-up, then I assembled a test cuff to confirm all pattern pieces.
Since the mock-up guaranteed that my pattern would work, I sewed up the real gloves last so I could focus on everything else, melt my brain troubleshooting issues, then have something easy to sew last. So when I got to the white gloves… It was a pretty uneventful step, really. Except for the sewing machine REFUSING TO SEW THIS FABRIC PROPERLY. After an hour of fighting every setting and trying everything I could think of, I realized Upholstery Thread and Tech Neoprene fucking hate each other. I swapped back to regular thread and double sewed everything and just moved on with my life.
SONIC GOT THROUGH… ACT 4… God I hate how temperamental sewing machines can get. At least it didn’t spit out needles this time (WEAR. PROTECTIVE. GEAR. If you sew bastard fabrics I beg you)
Part 5: Inside the Head
So we’ve got a completed Sonic, albeit eyeless and innards…less. Well actually he’s got innards (I’m innards), but he’s missing some QOL features inside his head. Let’s remedy that by finishing up the head first. First up: The eyeplate.
When I had a final shape for the eyeplate post-head completion, I measured the size of the pupils on my mock-up, drew some eye designs on Clip Studio Paint, And sent the files out to OtterHalfCostumes to be printed on mesh. That way I could thoroughly wash the head in the future without worrying about the eyes getting damaged. I checked the sizing on my test eyeplate when I received the mesh and got some promising results!
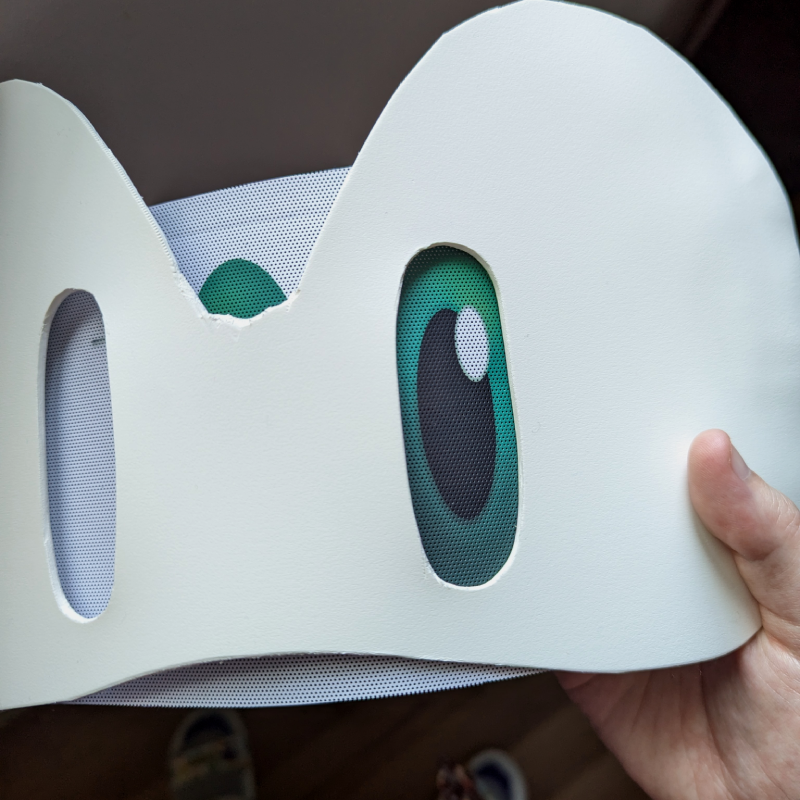
With everything properly tested, I finally cut out my second eyeplate out of Sintra, this time using the digital eye design to accurately cut and sand the holes to the exact shape. Like last time, I heat formed the eyeplate to create the right curve, and once everything fit right, I hot glued the eyemesh onto the plate. Finally, I very carefully glued the Sintra eyeplate into the head using a bunch of E6000 glue. It has a CRAZY STRONG BOND, but the cure time is also super long. It’s the part I was most worried about breaking however, and it was the best choice for this specific attachment job. I ended up with a strong, practically invisible bond and a smooth look.
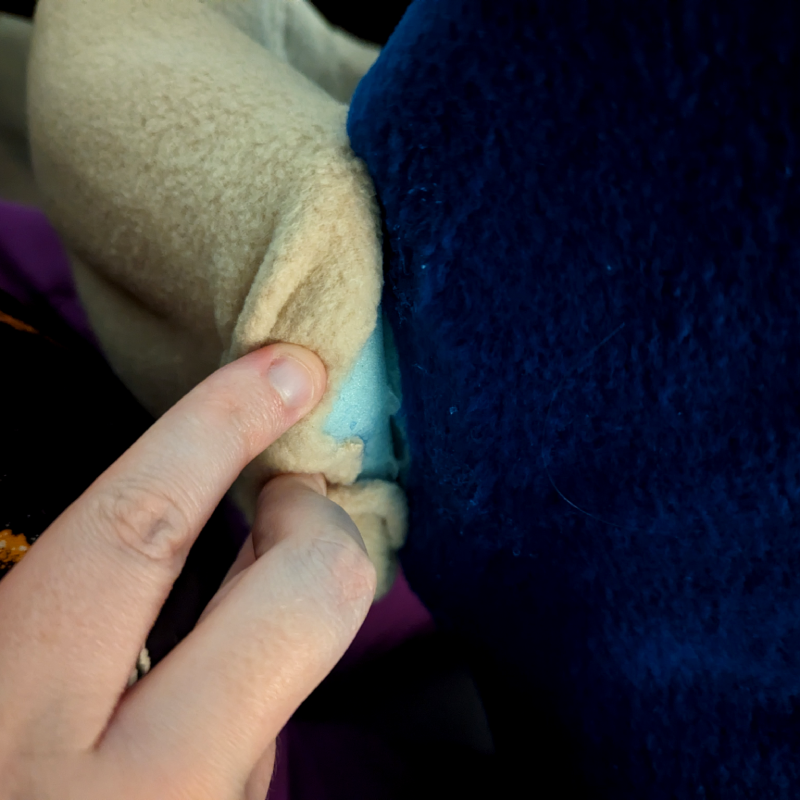
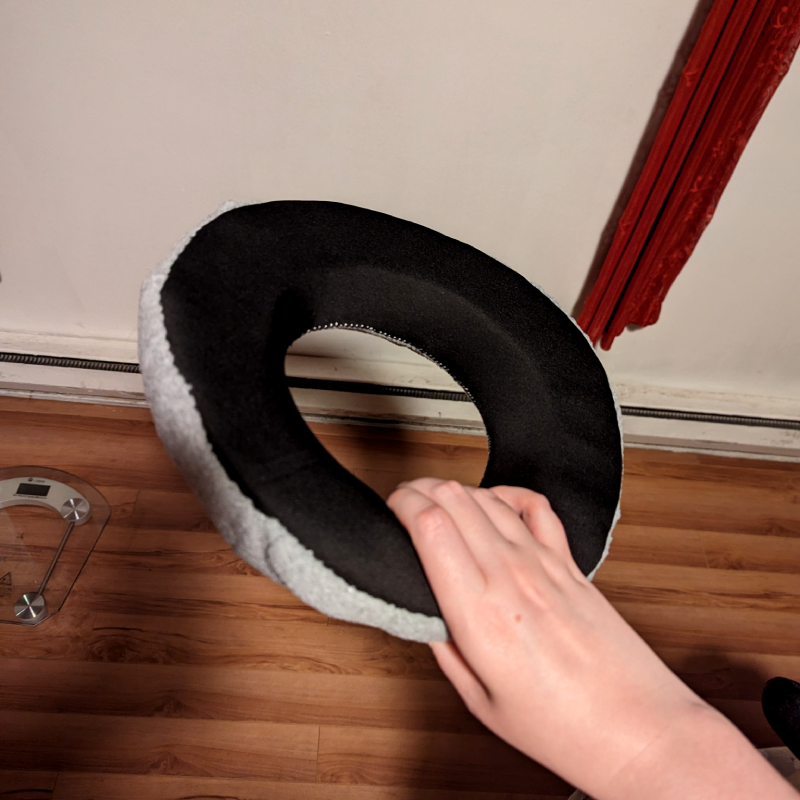
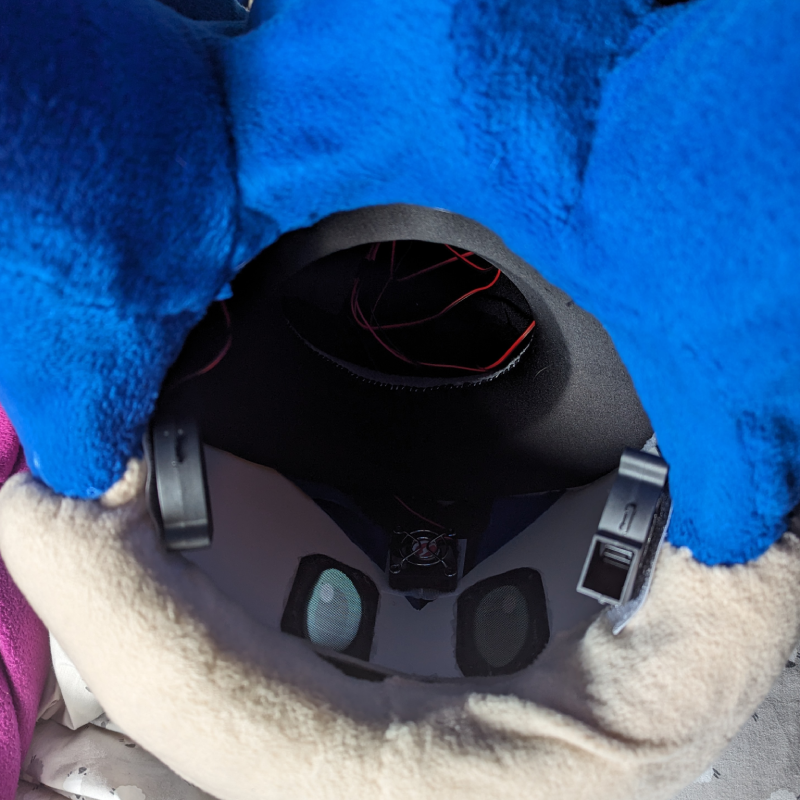
Now that the outside was COMPLETED, I needed to furnish my battlestation. I got to making the padding first. I tried a few shapes of padding throughout the build to test things out, but I ended up settling on a donut shape that would stabilize it like a hardhat would. I cut my donut out of upholstery form, cut a hole in the middle and carved the top diagonally to rest into the head proper, then covered it in fabric. The side resting on my head is lycra, to wick away sweat, while the side resting on the inside of the head is fleece so that it has some grip to stay in position. This allows the padding to be adjusted, and removed for washing.
FINALLY, for the very last step in this journey, I installed the fan system. The addition of the eyeplate makes this head a sauna; this is NOT a head type with good ventilation, so it was imperative to add fans to it. It’s a three-fan system with an intake and exhaust fan at the edge of the neck hole, and a little fan blowing on my forehead for comfort. I added some velcro so that every fan could be removed for washing, got the battery pack pocket sewn up in the top above where the padding would usually rest so it’s out of the way, and snuck the wires into the empty space above my head where they’ll be out of the way.
SONIC GOT THROUGH ACT 5! It’s done the build is completed holy shit
Level End Jingle
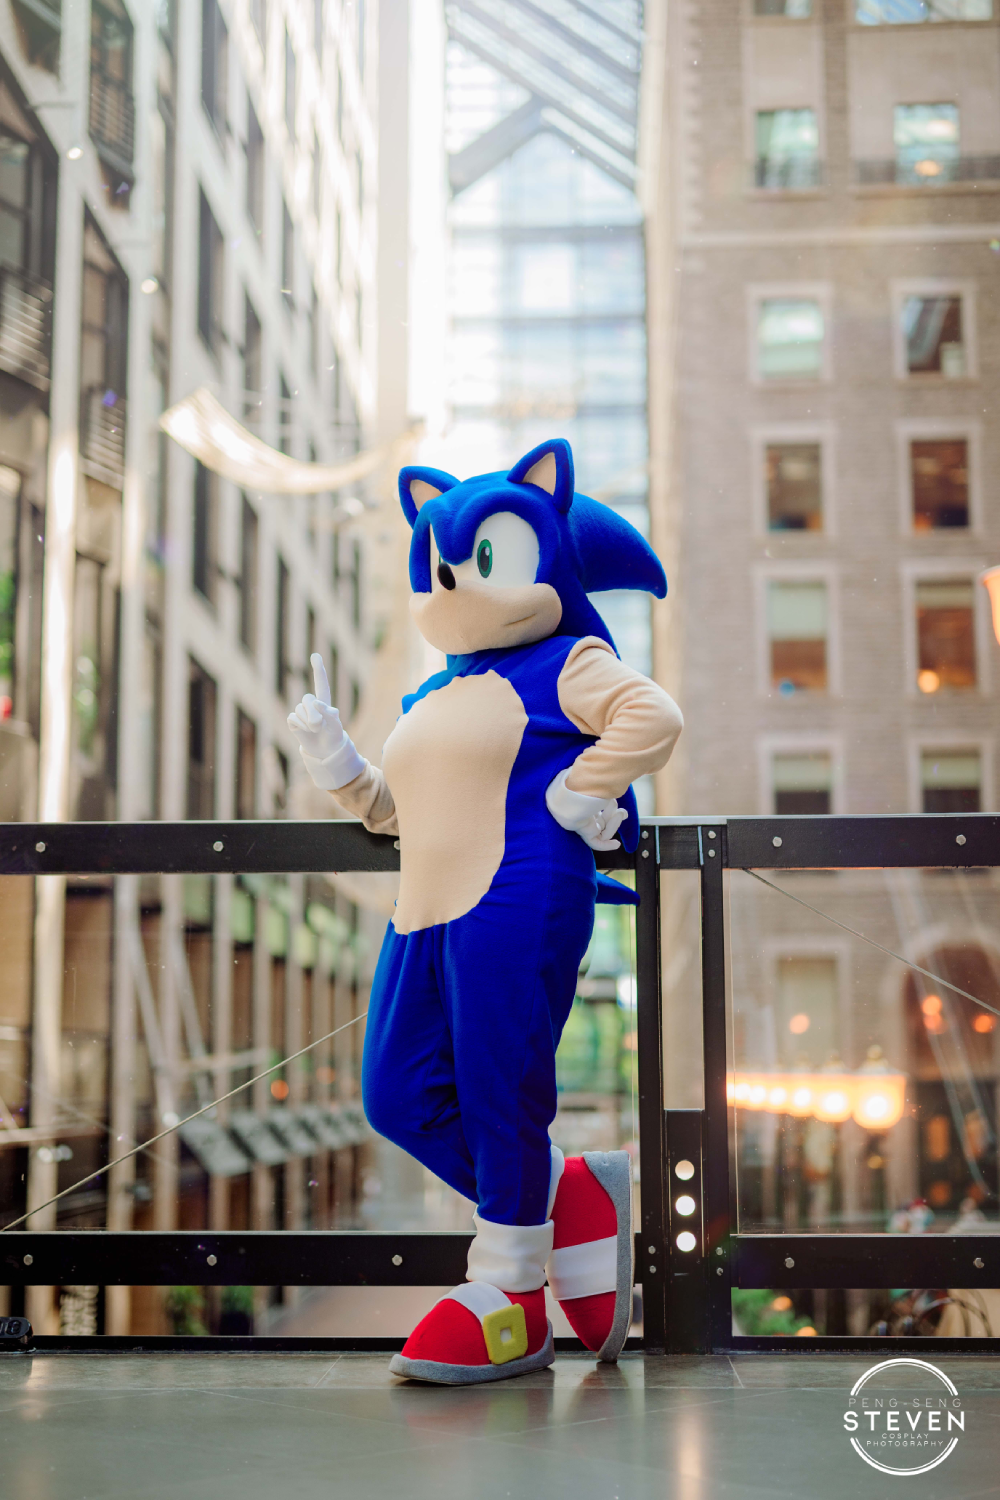
I cannot overstate how proud I am of this cosplay. It’s a culmination of a bunch of bullshit crafting methods, a bunch of new techniques, and a couple materials I hadn’t gotten to try before. The whole thing took almost a month to the day to complete, and it feels surreal to finally wear a costume I’d been dreaming of ever since I learned what cosplay was like 15 years ago (There was another childhood dream cosplay I completed during the pandemic (Young Link), and it was pretty fulfilling to make (especially the props!) But seeing my regular human face on a character with a stylized human face feels like the definition of the Glamour Failure trope.)
But then I look at this costume and my brain gets tricked by the overall look and it feels just right. When I finished it, I wasn't sure if it would survive the convention, let alone if I would survive wearing a mascot all day, but nothing could really dampen the simple joy of being Sonic the fucking Hedgehog.
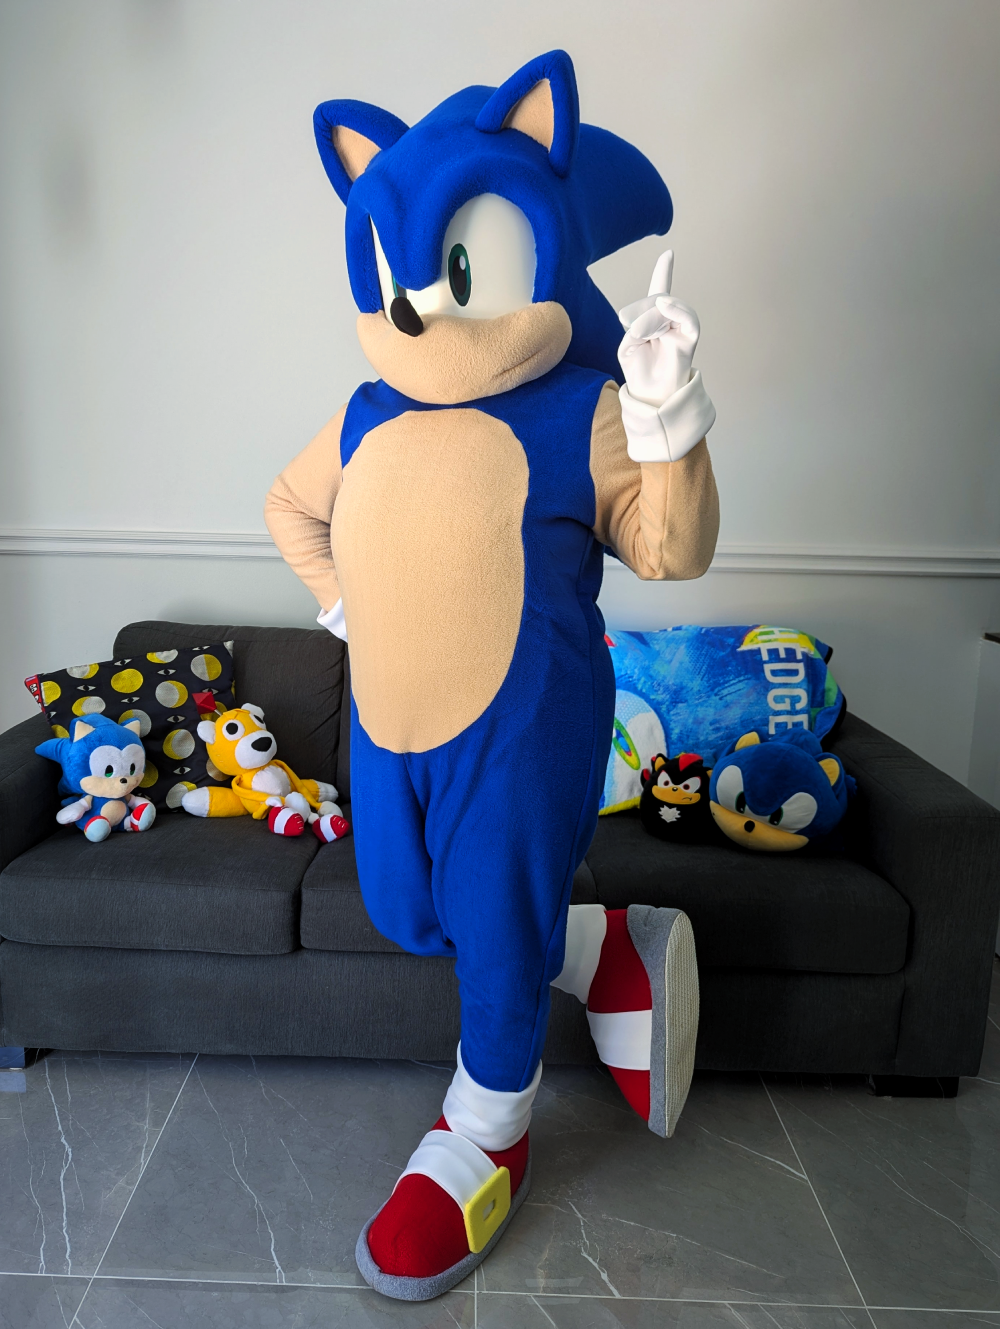
New Game Plus
A year later (September 2025), I revisited the costume to improve the bodysuit; the original version had quite a bit of puckering on the belly marking (I messed up my measurements originally), alongside those dreaded boob-pecs I wasn't satisfied with. I pulled out the same pattern as the original, modified it a bit to add some extra roundness to the body and pulled in the shoulders a little, and followed the same steps as before. The experience having assembled the first one helped me avoid making those mistakes again, thankfully! In order to better match Sonic's proportions, I added a slab of upholstery foam as an insert to pad out the belly and get a smooth finish. I think it was the right call; it's quite the improvement to the overall look!
At this point, this is about as far as I can take this costume without re-doing the entire head; though I'm still quite happy with it, so I don't think I'll be doing that for a little while. Enjoy!
First Event Post-Mortem
I first wore Sonic to Otakuthon 2024, during a sweltering heat wave.
On the upside, the day went without a hitch! Sonic was easy to carry in public transport with two large bags to the convention, despite the very large head. I didn’t need a handler at all times, and spent a decent chunk of the time fullsuiting by myself. Performing was comfortable, vision was very good straight ahead, and range of motion was excellent outside of the head spikes. Despite the heat wave, the costume was surprisingly comfortable as the underlayer wicked away sweat and made it super easy to take short breaks to cool off with the suit partially off. I was drenched, granted, but instead of feeling sticky I was just hot. The head padding did wonders at redistributing the head's weight and I didn't have any neck pain by the end of the day.
On the downside, the integrated head fans didn’t seem help much. They didn’t cool things to any noticeable degree, and the lack of mouthhole makes this a very sweaty mascot head. It was easily mitigated by taking breaks to air it out, thankfully, and I'll admit it's hard to tell if the fans were doing their job by keeping it from being unbearable, or didn't actually do much. The shoes' rubber also peeled very slightly from walking all day at the toe part, but it was easy to glue back on after the convention and no other parts sustained any damage during the weekend. Lastly, despite being wearable without a handler, I unfortunately needed someone to babysit the head while I went to the bathroom; it's just not doable otherwise. Oh, and Sonic looks kinda booby unfortunately but that’s the perfectionist in me talking this is in my "let's stop worrying about all that" era.
All in all, Sonic ran where Wurmple crawled (haw), helping me shape a new outlook on costume making. They re-ignited my love for cosplay and gave me a whole new style of costume I wanted to keep exploring and working on. Mascot performance is insanely fun, and the crowd at the convention loved Sonic so, so much. I hadn't interacted with so many people in years!